

Setting up a cPanel server on AlmaLinux is usually a smooth process, but it can sometimes come with unexpected challenges, particularly with network configuration. During a recent project on AlmaLinux 8, I encountered a frustrating issue: after successfully installing cPanel, the server became unreachable following a reboot. Despite several attempts, including reinstalling the server, the problem persisted.
This issue, which has been noted particularly with AlmaLinux 8, often occurs because cPanel turns off the default NetworkManager service and switches to a traditional network service during installation. This change can cause problems, especially if custom network settings are already in place.
I eventually resolved the issue by accessing the Proxmox console and turning NetworkManager back on, which immediately restored the server’s connectivity. This experience showed me the importance of managing network settings carefully when working with AlmaLinux, particularly when custom setups are involved.
For those managing multiple IPs on their server, understanding how to configure the network is even more important. You may find it useful to manually configure multiple IPs in AlmaLinux to ensure everything runs smoothly, which can help prevent similar network issues from happening.
If you are dealing with similar issues on AlmaLinux, whether using version 8 or another version, this guide may provide the solution you need. The steps and tips offered here aim to help you avoid or resolve the network issues that can arise after a cPanel installation.
Common Network Issues After cPanel Installation on AlmaLinux
When you install cPanel on AlmaLinux, various network-related issues can arise. These problems often result from changes made during the installation process, particularly when the default NetworkManager service is disabled. Here are some of the common issues you might encounter:
- IP Address Not Binding: After installing cPanel, your server might fail to bind its IP address correctly, leading to a loss of network connectivity and making the server unreachable. This often occurs because of conflicting network settings introduced during the installation.
- Firewall Blocks: The firewall may block essential ports needed for services such as SSH, HTTP, and DNS after or during cPanel installation. This can prevent access to cPanel and other critical services due to alterations in firewall settings or conflicts with existing rules.
- Incorrect DNS Settings: Misconfigured DNS settings can cause domain resolution issues, making your server and its hosted sites inaccessible. This typically happens if DNS settings are not correctly applied or are overwritten during the cPanel installation, especially when NetworkManager is disabled.
- Network Interface Configuration Errors: Misconfigurations in the network interface can result in the server becoming unreachable. This issue frequently arises if the network service does not correctly manage the interface settings after cPanel installation, particularly when NetworkManager is replaced.
- cPanel/WHM Ignoring the Ethernet Interface: In some cases, cPanel or WHM might not recognize the ethernet interface, leading to connectivity issues. This usually occurs due to improper setup in the network configuration files or if the network service fails to identify the interface after installation.
Troubleshooting Network Issues After cPanel Installation on AlmaLinux
Now that you are familiar with the common network issues that can arise after installing cPanel on AlmaLinux, it is time to move on to troubleshooting. If you are new to managing IP addresses or need some additional context, you might find it useful to check out this guide on preparing your IP information. It covers the basics that will help you understand the steps ahead.
If your server is not binding its IP address after installing cPanel, resulting in a loss of network connectivity, here’s what you can do:
Step 1: Locate the Network Configuration File
The first thing you need to do is find the file that controls your network settings. This file is usually located in the /etc/sysconfig/network-scripts/ directory. The file name will likely be something like ifcfg-eth0, depending on your network interface.
Open the file using a text editor. I assume by now you are either using nano or a similar text editor, so the command to open the file would be:
nano /etc/sysconfig/network-scripts/ifcfg-eth0
Step 2: Check and Correct Network Settings
Inside the configuration file, you will find the settings for your IP address, subnet mask, gateway, and DNS servers. These settings are essential for your server to connect to the network. If you are unsure about the correct values, you should consult your hosting provider or refer to the IP configuration guide mentioned earlier.
After verifying that the settings are correct, save the file. In nano, you can save your changes by pressing Ctrl + O, and then exit by pressing Ctrl + X.
Step 3: Ensure NetworkManager is Installed and Running
NetworkManager is responsible for managing your server’s network interfaces, making it easier to handle network configurations, especially in environments with multiple interfaces or complex setups. If NetworkManager is not installed, you can install it using:
yum install NetworkManager -y
Once installed, ensure that NetworkManager is active and set to start automatically when your server boots:
systemctl start NetworkManager
systemctl enable NetworkManager
Step 4: Restart the Network Service
After ensuring that NetworkManager is managing your network configurations, you need to restart the network service to apply the changes. Restarting the network service ensures that any new settings are correctly applied:
systemctl restart network
Step 5: Configure the Firewall
Your firewall is essential for security, but it can also block important ports if not configured correctly. After cPanel installation, firewall rules might inadvertently block necessary ports like SSH, HTTP, and HTTPS, leading to connectivity issues.
If you are using UFW (Uncomplicated Firewall), you can check the status of your firewall and see which ports are currently allowed:
sudo ufw status
To open necessary ports, such as those for SSH (port 22), HTTP (port 80), and HTTPS (port 443), you can use the following commands:
sudo ufw allow 22/tcp
sudo ufw allow 80/tcp
sudo ufw allow 443/tcp
sudo ufw reload
For iptables users, you can view the current firewall rules with:
sudo iptables -L
If you find that important ports are blocked, you can add rules to allow them:
sudo iptables -A INPUT -p tcp --dport 22 -j ACCEPT
sudo iptables -A INPUT -p tcp --dport 80 -j ACCEPT
sudo iptables -A INPUT -p tcp --dport 443 -j ACCEPT
sudo iptables-save
If you encounter issues, you might temporarily disable the firewall to troubleshoot, but remember to re-enable it after resolving the issue:
sudo ufw disable  # UFW
sudo iptables -F  # iptables
Step 6: Verify Network Connectivity
Finally, ensure that your server is now able to connect to the network. You can test this by pinging an external server, such as Google’s DNS:
ping -c 4 8.8.8.8
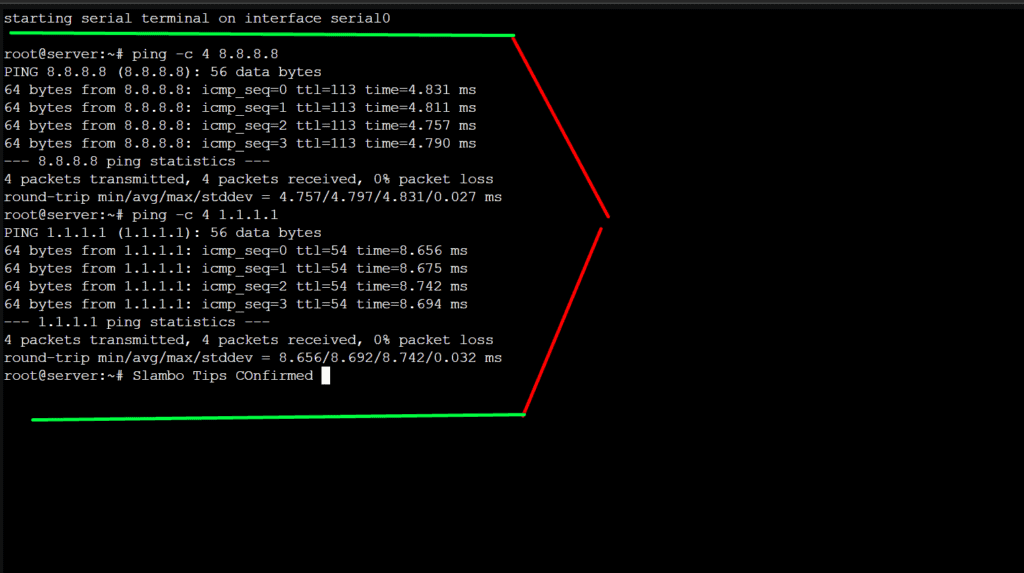
If you see responses, it means your server is successfully connected.
Just remember, disabling the firewall should only be a temporary measure to prevent setup issues. Once you have everything running smoothly, it is important to re-enable your firewall and configure it so that only the necessary ports are open. Maintaining server security is vital, but it is equally important to ensure that your server functions correctly.
When to Consider Professional Assistance
Even after following all the steps meticulously, you might find that your AlmaLinux server is still not behaving as expected. This is not uncommon, and it is perfectly normal to encounter challenges along the way.
If you have reviewed everything and your server is still not working as it should, it might be time to seek professional assistance. An experienced professional can offer a fresh perspective and may identify solutions that are not immediately obvious.
Finally, if this guide has been helpful or if you are still experiencing difficulties, I encourage you to share your thoughts in the comments below. Your feedback not only helps refine this guide but also provides support to others who may be facing similar challenges.