


Intel CPUs are known for their high performance, but they also have a reputation for being power-hungry and running hot, particularly during demanding tasks. This has been a common challenge for users, especially gamers and enthusiasts, who need to balance performance with effective temperature management.
These issues have become more prominent with the latest 13th and 14th-generation Core i9 processors. The “K” versions, which are designed for overclocking, have shown particular vulnerabilities, with reports of system crashes and thermal instability. These problems are often linked to the high power and thermal demands that push these CPUs to their limits, sometimes exacerbated by BIOS settings that may disable essential thermal and power protection features.
What is CPU Undervolting?
Undervolting involves reducing the voltage supplied to your CPU. By lowering the voltage, you can decrease heat output and power consumption, which helps prevent thermal throttling. Thermal throttling occurs when the CPU slows down to avoid overheating, which can significantly impact performance. Using Intel XTU, you can manage the voltage settings of your CPU to maintain cooler temperatures and optimal performance.
Required Tools for Undervolting
To successfully undervolt your CPU and manage its performance using XTU, you’ll need the following tools:
- Intel Extreme Tuning Utility (XTU): A powerful tool from Intel that allows you to adjust critical CPU settings like voltage and core ratios. This guide will focus on using XTU for undervolting.
- HWMonitor or Core Temp: These monitoring tools help you track your CPU’s temperature, voltage, and clock speeds in real-time, ensuring that the changes you make are safe and effective.
- Prime95: A stress-testing tool used to verify system stability after making changes.
Step 1: Install Intel Extreme Tuning Utility (XTU)
To begin, download and install Intel XTU from the official Intel website. Once installed, launch the application and familiarize yourself with the interface. Intel XTU will be the central tool for making all necessary adjustments to undervolt your CPU.
Step 2: Set Power Plan to Balanced in Windows
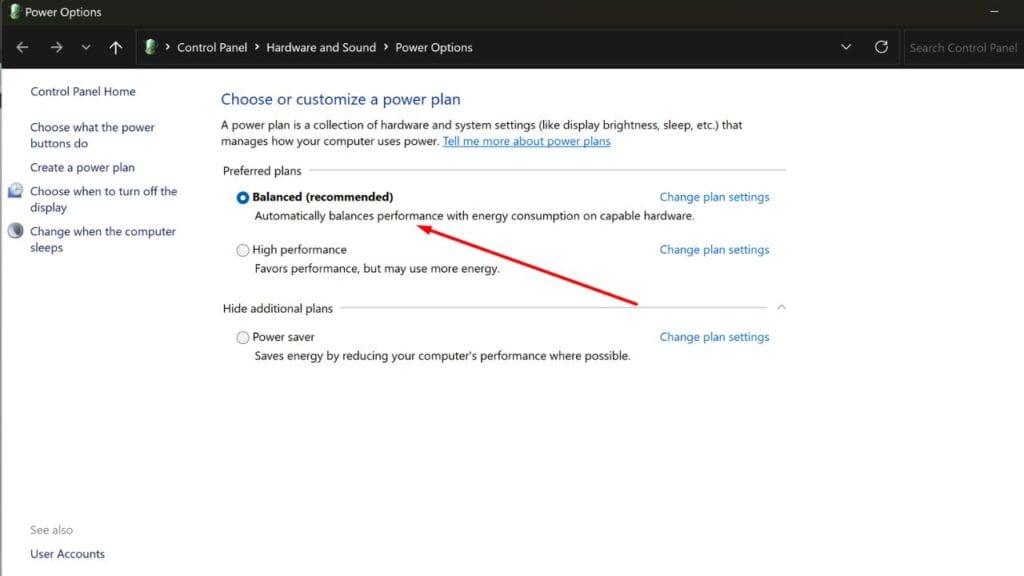
After installing XTU, the next step is to adjust your power settings. Open the Windows Control Panel and navigate to Power Options. From here, select the Balanced power plan. This setting helps your CPU adjust its power usage based on demand, reducing unnecessary heat.
Step 3: Monitor CPU Performance with HWMonitor or Core Temp
Before making any changes, it’s crucial to monitor your CPU’s current performance and temperature. Open HWMonitor or Core Temp and take note of your CPU’s baseline temperature and voltage readings. This will help you assess the impact of the adjustments you make in the following steps.
Step 4: Adjust the Core Ratio in Intel XTU
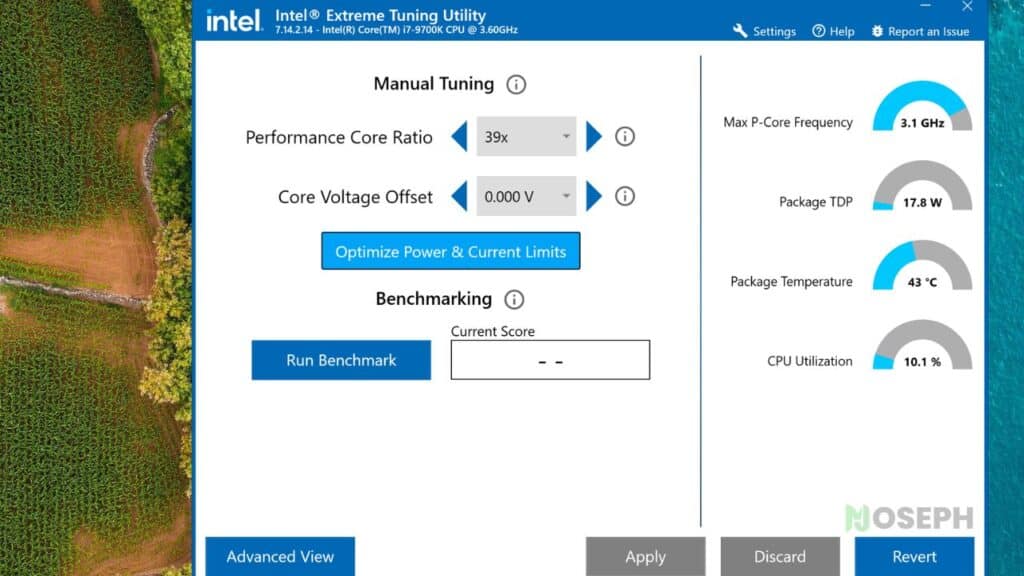
With Intel XTU open, locate the section for adjusting the Core Ratio. The Core Ratio controls the operating frequency of your CPU. To reduce heat, lower the Core Ratio slightly. For example, if you’re using an Intel Core i7-9700K, adjusting the ratio to between 37x and 40x can significantly reduce temperatures while maintaining good performance.
Step 5: Apply Core Voltage Offset in Intel XTU
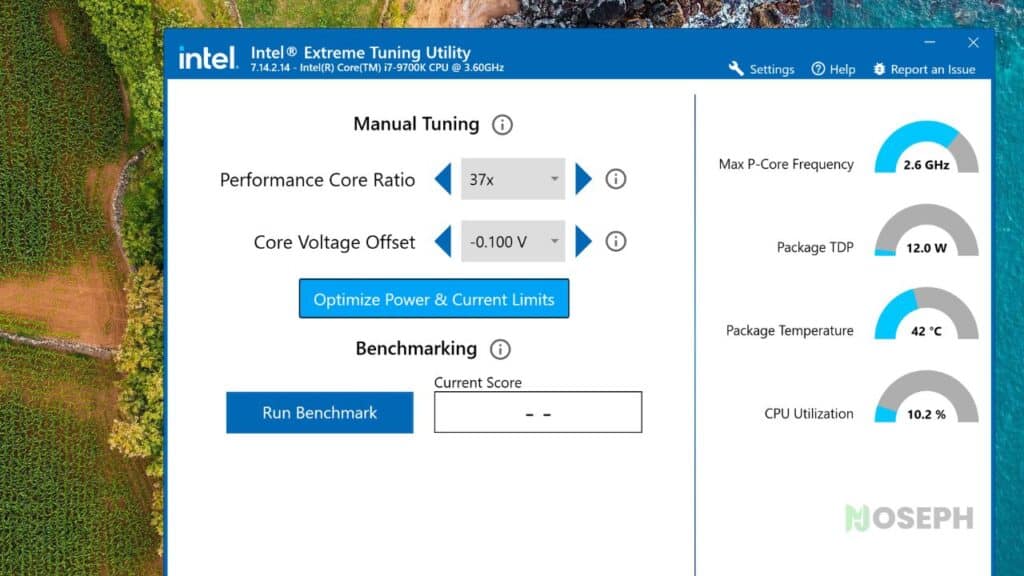
After adjusting the Core Ratio, it’s time to apply a Core Voltage Offset. In Intel XTU, find the setting for Core Voltage Offset. Start by applying a small negative offset, such as -0.020V. Gradually increase the offset while monitoring your CPU’s stability and temperature. Typically, an offset between -0.080V and -0.100V is effective in reducing heat without compromising performance.
Step 6: Test System Stability with Prime95
Once you’ve made your adjustments, it’s important to test your system’s stability. Use Prime95 to run a stress test on your CPU. Monitor your CPU’s temperature and performance closely during the test. If your system remains stable, the undervolt was successful. If you encounter instability, revert to your last stable settings and adjust further.
Step 7: Fine-Tune and Save Your Settings
After confirming stability, you may want to fine-tune your settings to achieve the best balance between performance and temperature. Make slight adjustments as needed, and once you’re satisfied, save your settings in Intel XTU. This ensures that your CPU will continue to operate efficiently with the new settings.
Intel Core i7 9700k CPU Undervolting: Detailed Temperature and Performance Benchmarks using XTU
The table below provides a clear comparison of temperature changes across various core ratios, both with and without undervolting, helping you identify the best settings to keep your CPU cool and stable.
| Core Ratio (GHz) | Undervolting (V) | Idle Temp (°C) | Load Temp (°C) | Observations |
|---|---|---|---|---|
| 3.6 GHz (36x) | No Undervolt | 42°C | 63°C | Low temperatures, stable performance under load |
| 3.6 GHz (36x) | -0.100V | 48°C | 59°C | Slightly lower temps, excellent stability |
| 3.7 GHz (37x) | No Undervolt | 46°C | 59°C | Very cool and stable under load |
| 3.7 GHz (37x) | -0.100V | 50°C | 55°C | Best cooling results, extremely stable |
| 4.1 GHz (41x) | No Undervolt | 50°C | 79°C | Moderate temps, reasonable performance |
| 4.1 GHz (41x) | -0.100V | 50°C | 74°C | Reduced temps, good balance between performance and cooling |
| 4.2 GHz (42x) | No Undervolt | 50°C | 80°C | Higher temperatures, still within acceptable range |
| 4.2 GHz (42x) | -0.100V | 50°C | 76°C | Noticeable drop in temps, more stable for longer sessions |
| 4.3 GHz (43x) | No Undervolt | 50°C | 88°C | Starting to reach higher temps, but manageable |
| 4.3 GHz (43x) | -0.100V | 50°C | 81°C | Significant temp reduction, more stable for prolonged use |
| 4.4 GHz (44x) | No Undervolt | 50°C | 94°C | Higher temps under load, starting to push limits |
| 4.4 GHz (44x) | -0.100V | 50°C | 83°C | Reduced temps, more reliable performance |
| 4.5 GHz (45x) | No Undervolt | 50°C | 95°C | High temperatures, nearing thermal limits |
| 4.5 GHz (45x) | -0.100V | 50°C | 86°C | Improved temps, still on the higher side |
| 4.6 GHz (46x) | No Undervolt | 50°C | 100°C | Extremely high temps, risk of thermal throttling |
| 4.6 GHz (46x) | -0.100V | 50°C | 93°C | Noticeable temp drop, but still high; not ideal for prolonged heavy usage |
Is This Guide Suitable for All Intel CPU Users?
While my experience primarily involves Intel Core series CPUs, such as the i9 and i7 models, these techniques can be applied to other Intel CPUs as well, including those in the i5 series or lower-end models. Keep in mind that the effectiveness of these adjustments may vary depending on your specific CPU architecture and cooling setup.
If you’re using a non-overclockable CPU, such as those without a “K” suffix, your ability to adjust certain settings may be limited. Nonetheless, setting your power plan to Balanced and monitoring your CPU’s performance can still be beneficial.
My Experience with the Intel Core i7-9700K
In my primary PC, which uses an Intel Core i7-9700K, I’ve encountered challenges in keeping the CPU cool, especially during intensive tasks. By following the steps outlined above, I was able to significantly reduce my CPU’s temperature without compromising performance. An undervolt between -0.080V and -0.100V and adjusting the Core Ratio to 37x to 40x helped keep my system stable and cool, even under heavy loads.
Maintaining Optimal CPU Performance Over Time
To keep your CPU running smoothly after undervolting, it’s important to regularly monitor its temperature and performance, especially during demanding tasks. Tools like HWMonitor or Core Temp can help you stay on top of any changes. Additionally, ensure your cooling system is in good condition by maintaining proper airflow, cleaning dust filters, and considering upgrades to your CPU cooler if necessary.
Conclusion
Using Intel Extreme Tuning Utility (XTU) to undervolt your Intel CPU and adjust the Performance Core Ratio is an effective way to manage heat and maintain system stability. By following this guide, you can achieve lower CPU temperatures, reduce the risk of thermal throttling, and extend the lifespan of your components. Whether you’re optimizing your system for gaming or ensuring long-term reliability, these adjustments will help you get the most out of your hardware.